Saturday, April 30, 2016

Shades of Purple

Well, it's been a rainy, dreary week in our neighborhood, but as my husband says, we need the rain. (Booo!)  I'm just soooo ready for the Springtime flowers to start blooming.  Here is another example of a card that I made using the stamp set from Two Paper Divas called "Hello Spring."  I love the different sizes of daisies and the placing of them as well.  Take a peek:  


I tried something a little different this week and used purples for my card.  First, I layered white card stock with an ombre striped patterned paper from Papertrey Ink.  On top of that, I used a piece of watercolor paper to stamp my flowers from Two Paper Divas.  The daisies were colored using ZIG watercolor markers, #080 Violet & 081 Light Violet.  The center of each flower is topped with a pearl in various sizes.  Below the flowers is a border that was die cut and then a lavender bow was added to complete this Springtime card.

Thanks for taking time to stop by Kirby's Kards to see what's blooming!

Make it a great day!
Jenny

Wednesday, April 20, 2016

Hats off to the Grad

Can you believe it's almost May?  It seems like the month of May is even crazier than December!  There's Graduations, Mother's Day, Memorial Day and Confirmations.  I'm trying to get ahead so here's one of the graduation cards that I've made so far.  Check it out:


I started with white card stock for the base of my card and layered a black and white checked patterned paper on a portion of it.  Then, I layered a scalloped die and the graduation cap on top of it.  A lot of the kids at our church go to Shawnee Mission West and their colors are black and gold so I colored the cap and the bow around the diploma in those colors.  The graduation cap and diploma as well as the "Congratulations" sentiment are all from Two Paper Divas latest stamp set called "You Did It!"  To complete this project, I die cut a pendant border and a couple of stars on a silver glitter paper and added them to the card to make it special for the graduate! 

Thanks for taking the time to stop by Kirby's Kards!  I hope I have provided you with a little inspiration to create some graduation cards of your own.

Make it a great day!
Jenny

Monday, April 11, 2016

Two Paper Divas April Card Challenge

I was ecstatic when Two Paper Divas released the inspiration for their April Card Challenge.  Corals, oranges and limes...perfect springtime colors!  Check out how I incorporated them below:


I see so many abstract cards on Pinterest and I'm immediately drawn to them.  Here's my attempt at one of them:


Using watercolor paper, I stamped the funky flowers and colored them with Zig watercolor markers.  The flower stamps are from two sets by Two Paper Divas called "Flower Doodles and Flower Doodles 2."  These are such fun to work with as the possibilities are endless.  For my sentiment I used "You Made My Day" from the set "Everyday Sentiments 2."  The curly q's and scalloped stamp at the top of the card are from TPD's "All About Borders."  I only stamped a portion of them to frame the sentiment a bit.  


To complete this card, I splattered some ink all over the card using my Tim Holtz Spritzer and finished by adding a couple of clear sequins.

Thanks for taking the time out of your busy Monday to check out my card for Two Paper Divas April Challenge.  I hope you will play along with all of us and submit your creation on their website!

Make it a great day!
Jenny

Saturday, April 9, 2016

Springtime Flowers

Springtime is finally here and we're getting ready to start playing in the dirt at our house!  My husband and I enjoy working in our yard each year adding some more annuals and perennials.  Daisies are my favorite flowers and I think you'll see why I loved these latest flowers sets from Two Paper Divas.  Check them out:


This first card features stamp set "Birthday Flowers."  I started with a fun green and white polka dot patterned paper for the background to my card.  Then I scalloped the edge of a piece of white card stock and layered it horizontally across the card.  I stamped and colored each of the flowers with Copic markers and then added a coral bow and a few paper flowers finish off this card.

I'm really "digging" this new stamp, "Hello Spring"which is also from Two Paper Divas April Release.  I stamped it twice on white card stock.  The centers of the daises were colored as well as the leaves.  I wanted to leave the flowers white for a more simple look.  The sentiment is from an older Two Paper Divas set called "God's Creation."  To complete this card, I added an aqua and white printed paper to the top portion and topped it with a sweet felt flower and pearl.


Who wouldn't love getting this cake for their birthday??!!  The sentiment "Happy Birthday with Sprinkles on top!" was perfect for this fancy layered cake card!  I used different colors of felt for each section and then I topped them with lace and ribbon.  This was so much fun to make, but my tummy was growling the entire time!


Most of the stamps that I used for these three cards were from Two Paper Divas April Release that happened this past week.  Make sure you stop by their store and click on the "What's New" tab to see all of their fabulous new stamps.  Thanks for taking the time to stop by my blog to check out my latest cards!  I love to hear from you, so leave a comment if you have time!

Make it a great day!
Jenny


Saturday, April 2, 2016

The Old Truck

Lookin' for a manly card idea?  Well, I've got you covered!  This card features the Two Paper Divas  Truck stamp.  I stamped the truck image onto watercolor paper so I could use my ZIG markers (Deep Red #260, Light Gray #091, Beige #072 & Dark Brown #062)!  My husband told me I couldn't add bows or flowers to a man card, so I decided to tone it down with some brown and white checked paper topped with a few buttons and twine.  I used a vintage safety pin to attach my sentiment "Dad, you're the best!"  It's also from Two Paper Divas.


 This truck stamp reminds me of a truck that my Grandad, Walt, owned.  It was an orange pickup with a standard transmission and by the time my family got the truck, the floorboards were rusted out and we had to use bungee cords to hold the door shut.  I remember watching the pavement through the holes in the floor as my mom drove it to the city dump with a load of tree limbs and grass.  But, I think my favorite memory of the old orange truck was when my friend, Gayla, was riding in it and my Mom turned the corner a little too sharply and her door flew open and she literally yelped as she held herself in and tried to shut the door at the same time!  All of us can look back and laugh at it now.  

Make it a great day!
Jenny

Monday, March 21, 2016

Be the Reason using FMS #228

Today I'm using the latest sketch from Freshly Made Sketches for my card this week.  I love trying out these sketches because they make me think differently.  I have to take away all of my usual embellishments and make a card that is "clean lined and fresh."  Check it out:


Here's the sketch that I went off of:
I started with a cute orange polka dot patterned paper for the background.  Then I placed white card stock on top and stamped it with Two Paper Divas new set "All About Borders."  Instead of placing the border horizontally or vertically, I created a curve with the border and then stamped it a few times.  The sentiment, "Be The Reason," was stamped in orange ink and is from Two Paper Divas as well.  I added a few orange sequins along with a little twine down the left side to finish off this card.  

Thanks for taking a minute to check out my latest creation!

Make it a great day!
Jenny

Monday, March 14, 2016

Monthly Two Paper Divas Challenge

Two Paper Divas Monthly Challenge for March gives you so many options to pick from.  They are using a Tic-Tac-Toe board this month and it was a lot of fun deciding which three combinations I would choose from to help with my inspiration.  Below is a copy of the Tic-Tac-Toe board.  Let's see if you can guess which three I used.  I'll tell you at the end if you were right.


I started by using a green and white striped paper along the left half of my card.  Then, I used a mini pink check paper for the right side, which I used my corner rounder on.  The scalloped piece of watercolor paper was die cut and stamped with a couple sets from Two Paper Divas.  The sentiment is from "Rejoice" and the tulips are from "For Peeps Sake."  I am trying out a couple of new techniques with this card.  Instead of using Copic markers or watercolors, I used my ink pads along with a blending tool.  I started with an aqua color for my background.  Then I used green on the stems and leaves.  For the flowers, I used a couple of pinks, oranges and yellows to achieve the coloration I was looking for.  Notice I didn't care about going outside of the lines.


I splattered some water all over the scalloped portion for a watery spring look.  Finally, I added a few rain stones for effect as well as an orange button and a couple of leaves in the top left corner.

So, by now, I hope you have figured out which three I used.  If you guessed, Green - Stamps - Flowers you were right!  Now it's your turn.  Make sure you go to Two Paper Divas March Challenge and submit your card to them for you chance to win a $20 gift card to their store.

Thanks for stopping by to check out my Tic-Tac-Toe Challenge with Two Paper Divas!

Make it a great day!
Jenny

Saturday, March 12, 2016

Wishing you a Wonderful day!

Today, I'm sharing a sweet, anytime card.  We all need those cards in our stash that will work for many occasions, so check it out:


I started by using a pale green and white polka dot paper and I topped it with a pink seam binding bow.  I love my seam binding!  For the right portion of the card, I stamped a few of the flowers from Two Paper Divas set "Funky Flowers."  Sequins were added for a little bling!


The sentiment "Wishing you a Wonderful day" is from Two Paper Divas as well.  It was stamped in pink ink and popped up.  An easy card to create, but still a lot of sweetness going on!

Make it a great day!
Jenny

Friday, March 11, 2016

Two Paper Divas Blog Hop

It's time for the 1st ever Two Paper Divas Blog Hop!!!  Whoop, Whoop!!!  Thanks for hopping on over to check out my latest card using a couple of their latest stamp sets!


I used orange patterned paper (Papertrey Ink) on the left half of this card along with aqua chicken scratch paper (Papertrey Ink) on the right side.  Then I ran some mini white rick rack ribbon (from my stash) along the bottom of the printed paper.  I popped a white pierced circle (My Favorite Things) in the center and added a sweet little chick to the top!  For the body of my chick-ee I used an aqua button. The legs were stamped in black ink as well as the funny tail.  Those stamps were from Two Paper Divas set "For Peeps Sake."  The nose was cut out of orange paper.  It's he just the cutest, funniest thing ever??!


I added a couple of orange layered flowers with pearls to the top right portion of the die cut circle.  A few sizes of pearls were added on the left side as well.  This girl loves her pearls!  For the bottom section, I stamped the sentiment "Have a Happy Easter" which is also from "For Peeps Sake."


Finally, the fun squiggly border and scalloped border are brand new from Two Paper Divas "All About Borders."  They were stamped in orange and aqua ink, also from Papertrey Ink.

Be sure to check out all of the amazing projects by the Two Paper Divas Design Team members!  Make sure you leave a comment on each of our blogs for a chance to win a $20 gift card to the Two Paper Divas Store.

Your next stop is Martina!

Make it a great day!
Jenny


Jenny


Tuesday, March 8, 2016

Peeps for all!

Today's project is NOT a card...I know you are ALL shocked!!!  I wanted to make something fun using peeps!  So here it is:


I started with watercolor paper that was cut to 12 inches by 5 1/2 inches.  I then scored it at 4 5/8, 6 1/8 and 10 7/8 inches.  This allowed me to create this stand up package.  For the front I attached magnets under the polka dot paper so the package would stay closed.  On top of the patterned paper I added a coral seam binding bow and a fun flower border.  I decided to go wild with the pastel colors on the watercolor paper.  The eggs are from Two Paper Divas set called "For Peeps Sake" and I used  Haze Blue, Orange and Light Pink Zig watercolor markers on them. After giving them some color, I stamped each egg with a different background in black ink.  These are from Two Paper Divas set "Background Stamps 1."  The sentiment was popped and colored using those same markers to bring out the pastels once again.


Here's a look at the inside.  I added an Easter sentiment from the set "Wishing You A Happy Easter."

Now for the complete peep project:


Don't they look so cute tucked inside this little Easter present??!!


Thanks for hopping on over to my blog today!  Maybe this sweet treat will be coming to your door on Easter??!!  Oh, and I almost forgot, don't forget to come back on Friday for Two Paper Divas first Blog Hop!  It's going to be Epic!

Make it a great day!
Jenny

Saturday, March 5, 2016

New Stamps Galore

 It's been so hard to wait to show you my cards featuring the brand new March Release Stamp Sets from Two Paper Divas!!!  Today's blog post will feature a new flower set, high heels as well as a fun border set.  Okay here we go!


This bag of flowers with a little "for you" tag is all one stamp from the set "Flowers For You."  I started this card by running an aqua polka dot paper through the die cutting machine to create a stitched edge.  On top of that layer is white card stock that has been scalloped.  I stamped the image on the white paper and colored using Copic markers.  The bag has been stamped on a mini brown polka dot print paper and then cut out.  I was going for the look of burlap!  A little brown twine bow was tied around the bag.  To complete this card, I added some brown rhinestones to each corner and a coral bow.


Here's a look at the inside of the card using the sentiment that comes along with the same stamp set called "Flowers For You!"


A complete look of the card!

I wanted to make a spring birthday card for one of my co-workers who turned 60 this week.  Happy Birthday Marci!!!  I  started this card with a few patterned papers for the background.  The bottom section has a floral paper that is topped with a yellow and white striped paper which has been scalloped.  On top of that is a pink striped paper with white card stock that has been stamped using the stamp set "All About Borders."  I wanted to make the birthday border really stand out so I stamped it three times.  To finish off the top half of the card, I added a green bow and tied to the scalloped border.


 For the butterfly I used a new technique for me!  First, I die cut two butterflies on white card stock.  Then, using a couple of different colored ink pads, I brushed the different colors around until I got the coloration that I was looking for.  Finally, I used a toothbrush with a little water to splatter the butterflies.  I let them dry and added a few pearls to the top.  The bottom butterfly is glued down and the top one is just glued in the center so the wings are popped up.

Okay, next up is a couple cards using the latest stamp "You've Got Style."  This is such a fun girly girl set!!!


Who doesn't love black, white and pink together??!!  I used a black and white striped paper to create the background for this card. The high heels were stamped in pink and then accented with a mini scalloped border.  Finally, a pink ribbon was used at the top along with a few stick pins and sequins.  I want those shoes, super cute right??!!


I also tried something new on this card.  The stamp set "You've Got Style" features five different patterned high heels and the sentiment "If the shoe fits, buy one in every color!"  So, I couldn't resist using each shoe and lots of different colors.  The sentiment was stamped first in the center and then the shoes were stamped all over the rest of the card.  A pink seam binding ribbon was added at the top along with a heart stick pin and pearl.

 I hope you have enjoyed the latest stamps from Two Paper Divas!  Make sure you check them out along with the other designers cards using all of the other new stamp sets!

Make it a great day!
Jenny


Saturday, February 27, 2016

It's all about the EGG!

I have to say that this card was egg-citing to make!  My husband just groaned as he was reading that! Ha!!!  I started by looking up a digital egg shaped image on Pinterest, which I printed out.  Click here if you would like to try it! Then I traced the pattern on to the gray polka dot paper and roughed up the edges a little bit.  I added some watercolor paper to the middle section, and then stamped the two images from Two Paper Divas on it.  The "Happy Easter" sentiment is from their set entitled "Rejoice" and the cute chick is from "For Peeps Sake."  I added a little pink and gray watercolor on the birdie.  I cut some white lace and scalloped some pink paper to go along the top and bottom of the water color paper. To finish the card off, I added a couple wooden flowers as well as a pink bow with a music, flower cutout.  


Here's a peak of the inside (and yes, this egg shaped card actually stands up!):


Thanks for taking time to stop by my blog to see my latest creation!

Make it a great day!
Jenny

Saturday, February 20, 2016

Awww...some bunny loves you

"Some bunny loves you!"  I love that saying, it's so sweet!  Have you started decorating for Easter at your house?  Well, we're all ready for Easter and Spring at ours.  It's probably one of my favorite holidays to decorate for.  Don't you just love all the beautiful pastel colors that come out during this season??!!  On that note, I'm sharing a cute bunny card I made this week:


I wanted to try something new...white on white.  So, first I layered white card stock that had been die cut with big cut out dots over the top of my base layer of white card stock.  Then, I scalloped the edges on an aqua checked patterned paper and added it to the center of the card.  I used a few pearls to accent every other scallop.  A white flower die cut edge was added to the bottom of the patterned paper.  The bunny is from Two Paper Divas stamp set "Some Bunny" and it was stamped on watercolor paper and then cut out.  I used a little gray and aqua watercolor on him and then placed him on top of a plaid paper that I had die cut.  The sentiment is also from the same stamp set.  A soft aqua bow was added to finish off this card for that special "some bunny!"

Thanks for hopping on over to my blog to check out my latest creation!

Make it a great day!
Jenny

Sunday, February 14, 2016

Easter's On It's Way

I've been working on a few Easter cards since it's super early this year.  Can you believe it's March 27th?  Wow-zah!!!  Well...I better get going then!  Please check out my latest card:


I started with simple white card stock and topped it with a fun striped spring patterned paper which I die cut.  Then I used a polka dot embossing folder on the pink paper for some texture and added a strip of grass for a layering effect.  I stamped a couple Easter eggs from Two Paper Divas stamp set "For Peeps Sake" on patterned paper and cut them out.  The "Have a Happy Easter" stamp was stamped in a pale green ink and popped on top of another patterned paper.  Three different sized pearls were placed on the top left side of the card.  That does it!  A simple, easy card with a lot of springtime cuteness!

Make it a great day!
Jenny

Sunday, February 7, 2016

Two Paper Divas Sketch Challenge

I have the great pleasure of sharing a card using the first ever monthly card challenge by Two Paper Divas!  It starts on February 8th and will last for two weeks.  At the end of the challenge, Two Paper Divas will be handing out door prizes!  Make sure you check out their website for more details. Let's take a look at the sketch for this month's challenge:

Card-Sketch-#1

So, I have to give a little bit of backstory to this card.  One of our friends at church, just lost her stepson in an automobile accident.  It was very sad.  So I made this card not only for the challenge, but also to send to her and her family as a sympathy card.   


I started by figuring out what color combo I wanted to use...black, light pink, silver and white.  The heart patterned paper was divided into three sections, roughed up around the edges and then trimmed out with a pink scalloped ribbon.  On top of the black scalloped circle, I added a die cut cross, which I used white for the outside and a silvery glittered paper for the inside.  The church that is next to the the cross is also a die cut and I added a pink heart to it.  "With Sympathy" was stamped in white ink and is from Two Paper Divas "Banners #2" set.  On the bottom black section of the card, I also stamped another stamp from Two Paper Divas that reads: "sending you comfort during this difficult time" in white ink. That stamp is from their stamp set "Everyday Sentiments #3."  Finally, to complete this card, I added two different sizes of pearls to the bottom corners.

I really appreciate you stopping by my blog, Kirby's Kards!  Make sure you pop on over to the other designer's blogs for a peak at their creations using the same sketch from Two Paper Divas!

Make it a great day!
Jenny

Saturday, February 6, 2016

February Release

OMG!!!  I've got sooooooo many cards to share with you today!  Two Paper Divas just released their new stamp sets for the month of February, so that means that I don't have to keep the secret any longer!  Phew!


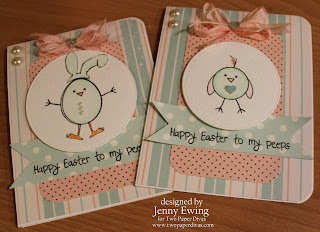
Aren't these little guys so stinkin' cute??!!  I had a blast making these two cards featuring new stamp set "For Peeps Sake."  Watercolors were used to color the chick and the bunny.  I went for a pastel color scheme with these cards.  Just love the aqua and light pink together!  I layered the tag, sentiment and circle for a little dimension.  A pink bow with twine was added to the top along with a heart and pearls.  There are just so many different combinations that you can do with this set, I think you're going to love it!


This next stamp set is probably my favorite of all of those released this month.  It's called "Rejoice."  The cross is lovely with the lilies and there's so many sentiments included with this set.  I used kraft paper for the base of this card and I topped it with a green patterned paper and then white watercolor paper.  I like to rough up the edges for a little different look sometimes.  I used water color markers to add some color to the lilies and to outline the cross.  A green bow with brown twine was added for a little extra touch.  To finish off this card I added brown rhinestones to two of the corners.  


This tag is perfect for a gift bag or Easter basket for that special someone!  The cross and lilies have been colored with watercolor markers and topped with Wink of Stella for some glittery shine!  A few pale green sequins were added along with pink and green ribbon and white/silver twine.  You'll be seeing many more cards featuring the "Rejoice" stamp set to come in the next few weeks.  It's beautiful!


Seriously, who doesn't love a yummy cupcake??!!  I love this mini cupcake border, which is also a new stamp from Two Paper Divas.  My color combination for the cupcakes was gray, pink, and red and I was able to find some patterned papers to match them.  I added pink and white twine along with a few stick pins to the top of this card.  "May your birthday be filled with sweet surprises" is the sentiment I chose from Two Paper Divas as well.


I decided to change it up a bit with this card.  The tulips are from the "For Peeps Sake" set.  I used the egg shell as a tulip instead.  Clever, right??!!  Wink, wink!  I layered a black and white patterned paper with a scalloped trim, grass and some red buttons. The "Plant seed of hope" sentiment is available from the Two Paper Divas set entitled "Seeds of Hope."

Hope you enjoyed my latest cards for Two Paper Divas big release!  Make sure you go to their website to check out all of the other designers creations...they are AWESOME!

Make it a great day and enjoy Super Bowl 50 tomorrow night!
Jenny


Sunday, January 31, 2016

Mini Cards

Who doesn't love getting a cute mini card in the mail?  They were super fun to create, so check out a few using one of the latest stamp sets from Two Paper Divas called Funky Flowers:


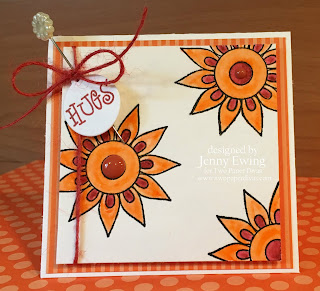
I started by using watercolor paper and stamped the flowers wherever I wanted.  Then I colored the flowers using ZIG markers and added a couple of sweet tags, twine and a stick pin.  Orange patterned paper was added behind the watercolor paper.


For the orange flower card I used watercolor markers #260 & #70.


I love aqua and orange together, so markers #70 & #49 were used on this card.  The watercolor markers are great because you can use as much or as little water as you like to get the color you desire.

Thanks for taking a minute to check out my latest projects featuring stamps from Two Paper Divas!  Make sure you stop back by this week as I have several cards to share!  And there's new stamps coming...

Make it a great day!
Jenny

Sunday, January 24, 2016

Hugs and Kisses

I have officially finished up my Valentine cards!  Don't you just love it when you get caught up?  At least for a day or two!  I'm sharing two Valentine cards with you, both using the "Hugs and Kisses" sentiment from Two Paper Divas.  Check them out:


For my first card I started with several pink patterned papers.  I layered multiple hearts on top of each other and added a sweet pink bow with a heart rhinestone.  For a little bling I added a couple sequins and then popped up the "Hug and Kisses" saying at the bottom.


My second card features the colors red, black and white.  I layered a few hearts on this card, added a mini clothespin and then completed it with the "Hugs and Kisses" sentiment.    I glued on a couple of wooden hearts and some lace with mini pearls along the right side to finish things off.


Hope you have started creating your Valentine cards to mail out to relatives, friends and loved ones!

Make it a great day!
Jenny